This article discusses some of the caption and border effects available with the ImageMagick image processing package. ImageMagick is freely available for Linux and Windows. It offers a huge number of image processing options, so many in fact, that using the program can be a little tricky.
The following examples were evolved from the ImageMagick online documentation, plus a good deal of trial and error to get the details right. I used Linux, but the same commands should work under Windows.
All the examples will use this picture of Durham Cathedral:
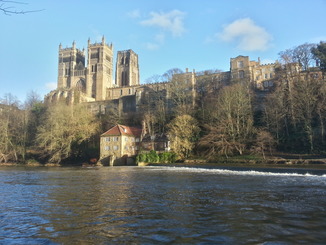
The image is 10% of the size of the original, which I took with a Samsung S3 smart phone. The command to shrink was ImageMagick convert:
$ convert cathedral_full.jpg -resize 10% cathedral.jpg
The following examples were also produced from the original full size image, cathedral_full.jpg. All therefore include the “-resize 10%” flag.
Example 1. Simple Frame
A simple frame can be added with ImageMagick montage. It comes with a bevelled effect, and the frame width is set to 5 pixels here:
$ montage -resize 10% -frame 5 -geometry +0+0 cathedral_full.jpg cathedral_framed.jpg
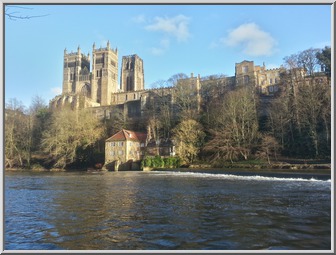
Example 2. Frame with Caption
To add a caption, we again use montage, but add the “-label” flag. -pointsize 20 is the size of the label text. The label will appear at the bottom of the picture.
$ montage -resize 10% -pointsize 20 -label "Durham Cathedral" cathedral_full.jpg -frame 5 -geometry +0+0 cathedral_labelled.jpg

Example 3. Polaroid Effect
This is one of ImageMagick’s more fancy effects. The processed image appears in a “polaroid” style frame, complete with shadow and paper curl. It looks like a photograph tossed onto a table top. A small rotation is also added. Lets see the result first, then check out the command used:
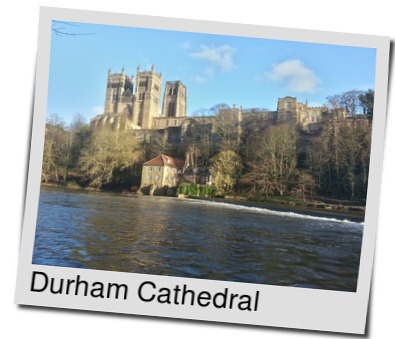
The above image was produced as follows, with a single convert command:
$ convert -resize 10% -set caption "Durham Cathedral" -pointsize 28 -background black -polaroid $(($RANDOM % 20 - 10)) -repage +10+5 -background white -flatten cathedral_full.jpg cathedral_polaroid.jpg
Explaining that command piece by piece:
convert -resize 10% -set caption “Durham Cathedral” -pointsize 28 -background black – this shrinks the image from the original size and adds our caption.
-polaroid $(($RANDOM % 20 – 10)) -repage +10+5 – applies the polaroid transform with a rotation randomly chosen between +10 and -10 degrees. If a number of pictures are processed in this way, each will appear with a slightly differing rotation, adding to the casual “table top” effect.
I have used the “-repage +10+5” option in order to offset the rotated “polaroided” image within its actal (unrotated) frame. Without -repage, there is clipping where the rotated image goes beyond the image border.
-background white -flatten – this changes the transparent parts of the rotated image to white, in order to merge with the white background of this web page. Otherwise those parts of the image would appear grey in the browser (rotated image within grey unroted block).
If you know more interesting ImageMagick effects, that might be useful in photo galleries, please comment below.